
It operates somewhat similarly to other industrial sewing machines but there are some significant differences. I'll point those out. On a side note, I have also found the Willcox and Gibbs to be quite adaptable to home use for things like quilting, general dressmaking and mending.
The Willcox Gibbs High Speed Lockstitch Sewing Machine with Automatic Lubrication.
 |
| 1940? Unknown age. |
 |
| Willcox and Gibbs Chainstich Sewing Machine 1875. |
Many years and innovations later the company would focus on the industrial sewing machine trade. The one I was most familiar with is the overlock first introduced in the 1880's and made into the 1970's. The company diversified and then stopped being in the sewing machine business in 1978, a long run indeed. The particular model discussed on this post, the lockstitch, was introduced in 1899 as a power driven high speed machine for the garment industry. It would come with compatible tables and motors designed for ease of use, power saving and reliability. The rotary feed and tension units took stress off the thread by turning in rotation rather than tugging on the spool, reducing breakage and parts wear.
 |
| Willcox Gibbs High Speed Lockstitch in a Factory Setting |


How Do They Work?
I first found some problems. It is a different bird as they say. Crazy presser feet, a wierd bobbin case and a lot of tangled thread in the rotary take up wheel. Ugh! An operators manual is my usual helper and was not to be found. The only manual located was on Ebay, and far away at that. I have heard there is one on the Smithsonian's archive website but i was unable to locate it presently. I suggest looking both places and getting one. In the mean time here are some basics.
 | |
| The Basics. |
*The Hand Wheel Turns Away. Do not turn towards the operator.
* The thread releases with the needle at the highest position. This is just like other machines.
*Needle sets with Groove to the LEFT.
Oiling the Machine.
 | ||
| Pull up lever on the oil pump to send the oil through the system. |
 |
| I use this to help pour the oil! |
The automatic lubrication machines should be tested. These operate very fast so it is essential that they be oiled properly to avoid damage. Before beginning fill the reserve with oil to the halfway point. If it overfilled it will leak. Pull the oil pump lever up, and let it go down slowly. There should a tiny drop of oil. Now, check the holes near the front and at the fly wheel. Add a little oil if it has been a long while since last use. I suggest adding some oil to all the moving parts of the bobbin case area. The bobbin winder unit should have a few drops of oil added to the port over the turning arm.
Now that it has been given a little oil, run at high speed to see if the system is clear and operational. Open the cover at the top, see that a small drop of oil formed at the tube going down. If not, oil manually. In time my machine went from not dripping oil to working fine so maybe some old oil clogged it, now gone.
Threading.
I have no threading diagram. There is one out there I saw it but cannot locate it. It seems it was on the Smithsonian's collection of trade ephemera. The threading procedure was a bit confusing, so here is how I do it with images to help.
 |
| Start here. |
Thread goes from stand to holes on pillar arm, through the tension spring and around the tension assembly. It is advised to go around two times. Next thread through the hole in the front.
 |
| (This is the back view) |

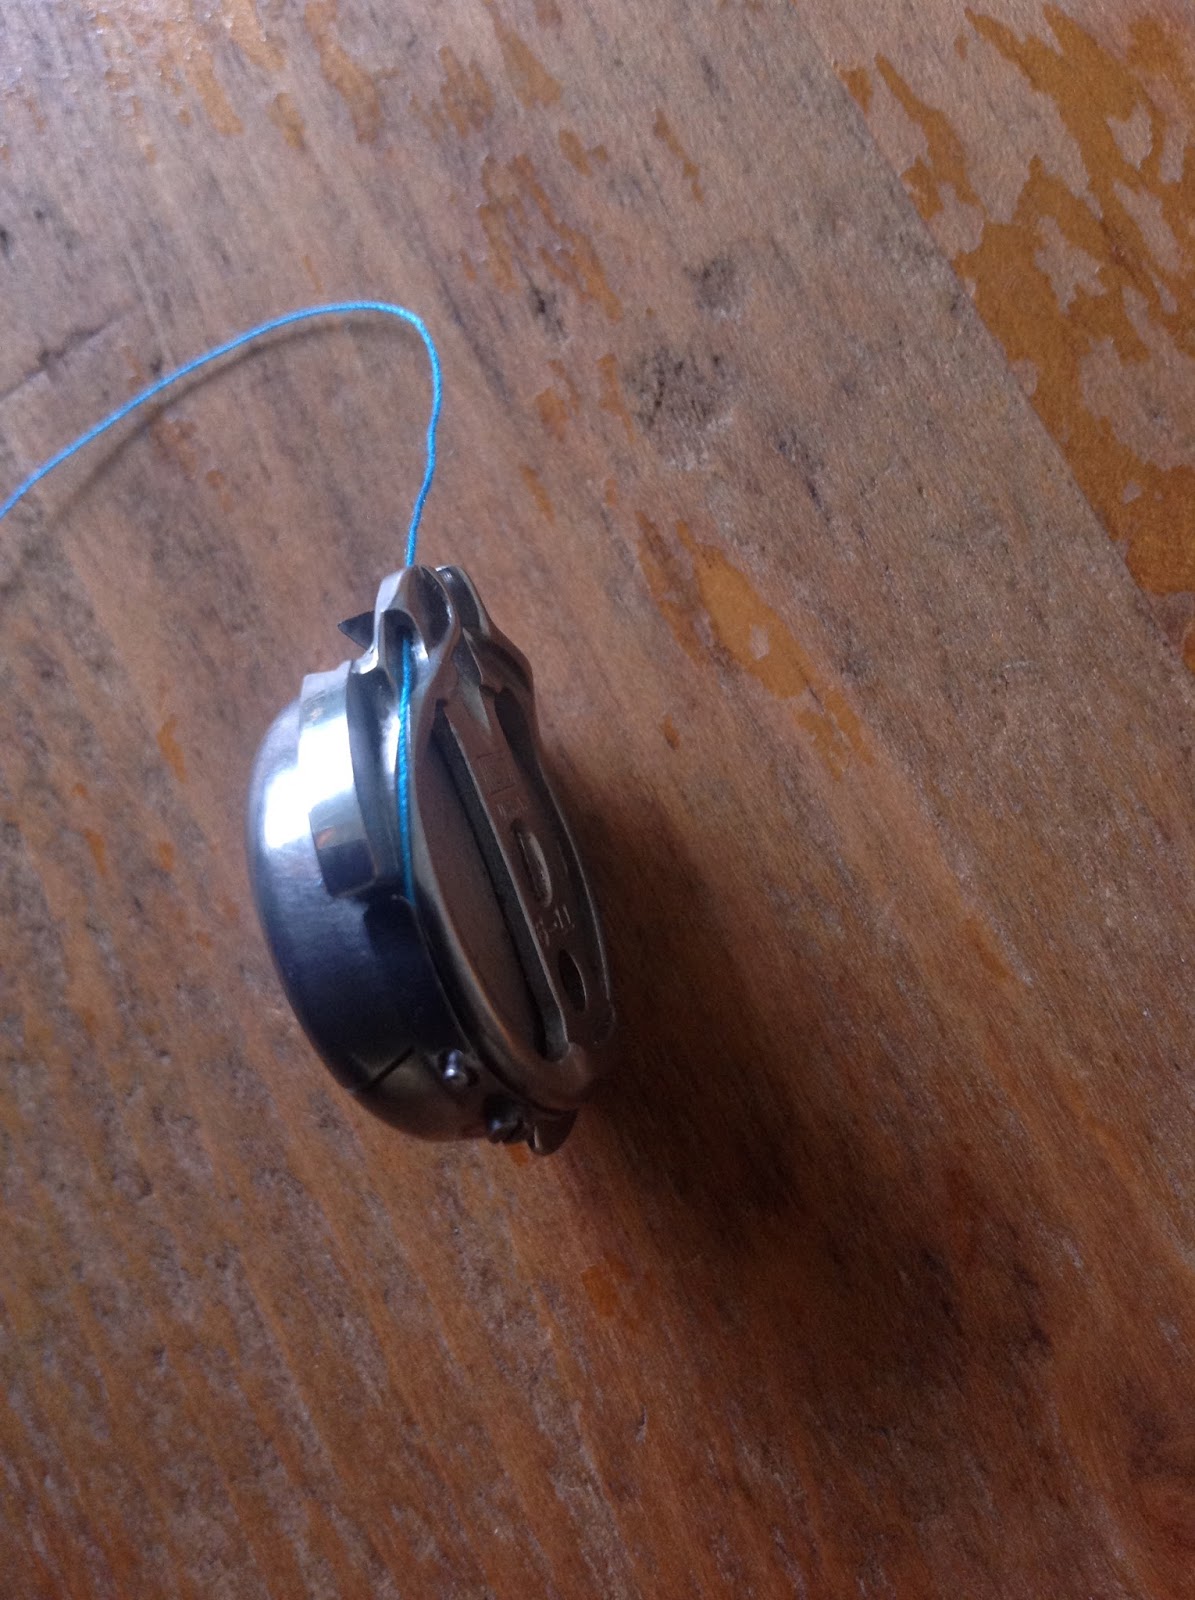
 |
| Bobbin case access |

The Bobbin Case.
Insert the bobbin as normal, with the unwinding thread opposite the leaf tension on the case. The leaf tension on my case needs special attention to make sure the thread goes under it properly. Then thread through the hole on the top.
 |
| Mine keeps doing this- just pull it under. Check yours. |
 |
| Proper threading of the Bobbin Tension. |
 |
| Through the hole and all done |
 |
| Bobbin inserted correctly, face down. Just push it back. |
I am unaware of other models of the High Speed Lockstitch machine so please understand there may be differences in features in older or newer machines. Here is how to make some adjustments to the machine for sewing different types of fabric.
Stitch Length:
Boy was this a mystery! Push in the metal button and turn the handwheel away from you until the numbers come into view. I am not sure exactly what they represent, other than a guess as stitche per inch as this is an American machine. Lower numbers for longer stitches, higher for smaller ones. I use 10 most for medium weight, 14 for light and 7 for denim.
Quick steps-
1. Press in button and turn handwheel AWAY until it clicks.
2.Turn again towards or away until you see the number you want.
3. RELEASE.

Presser Foot Pressure:
Turn the screw at the top of the machine near the round thread take up. It goes downwards for more pressure, up for less. I was able to get a big variation in this, a great feature. With it up can do free motion sewing like for darning or quilting. No special darning attchment was needed. With high pressure did a great job on canvas. Start in the middle and then experiment from there.
Winding a Bobbin:
Set bobbin in the slot, it fits tightly. Wind as normal. It has a mechanical auto stop.
How do I sew on a machine that does not have reverse? I need to keep the stitches from unraveling!
This is a hassle, I know. Having used many old sewing machines, this issue has become part of my life. I do love auto reverse, back tack and the best of all AUTOMATIC THREAD CUTTERS but they are not what life is made of. Here is my work around for treadles and others that have no reverse. It works for most fabrics but the lightest ones.
1. Make a 2-3 stitches.
2. Tug slightly so the machine goes over them again.
3. At the end of the seam, with needle at the highest point raise presser foot.Move it back 2-3 stitches. 4. Place down again and sew over the edge.
Here's a quick view of this maneuver:
If the video clip won"t play try this:
There is also the tried and true method of simply turning your work around sewing a few stitches and turning again. I do this for very heavy fabrics like Sunbrella or very light such as Charmeuse.
Things You Need For the Willcox and Gibbs Lockstitch
Belts.
You will need a belt for the machine and one for the motor. I got an industrial treadle belt from eBay. Note that it is the thicker version, not the one for household machines.
My set up required a 22" and a 26" belt. They fasten with a metal clip. Often the leather will stretch a bit so expect to re-install maybe once more until it sets. Yes, it is a bother! To fasten sometimes I use carpet thread rather than a clip, easier to do.Unfortunely there is no V belts to add as there is no way to insert them in my case.
There is too much variation to say what lengh each machine will need, as it is based on what set up is used but estimates can be made easily. Use the old belt or a a marked string going around the path to estimate length before you order.
Needles.
The Willcox and Gibbs High Speed Lockstitch requires a 75W Needle.
SET NEEDLE GROOVE TO THE LEFT.
Thankfully, needles are available but not too common. A clue to finding more is it is used by also by another industrial machine, the American Baster. Ebay has them but also here:

The numbering system for Willcox Gibbs needles are by single digits. 2-7 are what the machine takes. My general guide to what to use for what is this:
#2 Light
#3 Medium
#4 Heavier
#6 Heavy and Coated
#7 *&% Heavy
The #7 is the max it can handle, and for me it was the outdoor fabric Sunbrella with 4 layers.
Presser Feet and Attachments.
The Willcox and Gibbs has a unique presser foot system. This make the foot attachments very rare and hard to find. I found some here with the help of the owner, Ms. Howes.
There is some variation of of the shank height for some presser feet, so in time changes occurred. My machine takes the lower shank ones.
 |
| Very slight variation in shank height. |
The Willcox and Gibbs also seems to be able to take industrial attachment like binders, as there is a place on the bed for the screws. I have a binder that came with it but no bed screw. Modern ones ar too long but can be cut to fit. These binders are fantastic for edgings so worth trying to find a solution as to be able to use them.

Motor and Table Set Up.
There are many variations to motors for machines like this. I will leave that topic to others but will show mine as a possible research for others. The motor that came with this is a General Electric 1/2 HP. It was rewired at some point recently. The Thread spool stand, guard and table are a set by Willcox and Gibbs.


The light is probably part of the set up as well and made by Bryant. This articulated light has been re-wired and is easy to use and just super cool looking too.
 | |||
| Bryant Lamp |
And so there is enough information to begin some serious sewing with this American industrial sewing machine classic. My first attemps at sewing with this were frustrating, and I was close to giving up due ot tangled thread and broken needles. I then did some "trial and error" plus experiemntation to come up with a little help for future operators.
It is my sincere hope that such information will assist any person who comes across one of these so as to keep it and not let it become destroyed as so many do.

Cool. I have a chainstitch W&G, but, haven't seen any other W&G before, other than pictures.
ReplyDeleteI had not either. There is another called a Metropolitan I would love to see as well.
DeleteI recently bought a W&G highspeed lockstitch sewing machine. I can't for the life of me find anywhere that sells feet, bobbins or needles. Your blog threw me a ray of light ��
ReplyDeleteGlad I could help, not a lot of information on this type of machine out there.
DeleteI recently received a Willcox & Gibbs highspeed Lockstitch machine. Going by the pictures, I think mine is older and was made without the oil pump assembly. Not a lot of information on this machine at all!
ReplyDeleteWould it be possible to please post a picture showing the belt that comes down the pillar of the machine? Mine is missing and I want to be sure to replace it with the correct material. It seems like it should be a flat belt instead of a round leather one?
Also, where should I look for a bobbin case? Thank you - Sarah
HI Sarah this is Anne again, from LOL. I am still not home yet to photograph this. I hope Mr. McDonald can help when he gets the belts made.
DeleteHi Anne! Thank you for your suggestion on the other group - I have located a bobbin and am trying to sort this belt issue first.
DeleteThese machines are timed with a linen belt that is very unique and prone to breakage. I am currently developing a replacement made of nylon if one is ever required.
ReplyDeleteDo you have timing belts for type 10-R-6 of this machine
DeleteDo you have this belt?
DeleteHave you suceeded in producing this belt? Do you have any avaiable? I am in the market for one at this time.
DeleteWill McDonald,
ReplyDeleteOwner,
"Just Sew" machine repair
Sew, (lol) I'm tinkering with the machine now and am attempting a domestic treadle belt. It is far too thick and is getting stuck on the body of the machine. It seems that the belt should be around 19"?
ReplyDeleteTell me about your machines - I wonder how many are out there. How many of us W&G High-speed Lockstitch people are there left?
ReplyDeleteI have one machine, its rather old (1915 I think? idk...) and lacking the oil pump system, serial #L15 2879
I absolutely loved reading all your I'm formation! I have the lockstitch machine, I worked on it for at least 7 hrs yesterday! By looking at your photos I realized I wasn't threading the last part of the bobbin! I also ra0ed the thread around tension wheel 2 times, and for sure had the wrong size needle in. I can't wait to retry this machine with all the new imformation! I did get all the feet, and 5 or 6 different size binders. I was wondering if you could tell me if an upholstrey thread size 69 would work in this machine or be to thick??
ReplyDeleteSorry fornghe late reply, have been out of town. #69 thread is pretty heavy for this, but I would say it could work with the largest needle and go slowly. Use a lighter thread in the bobbin. I used a pretty heavy thread with sunbrella and it did fine for a kayak cover once. Glad to help, these are hard to find information on. I use it as my main machine when at home.
ReplyDeleteI just bought one of these not knowing anything about it or about sewing machines really. I wanted to get started in sewing so maybe this isn’t the ideal Machine given all of its quirks. It only
ReplyDeleteCost me $25 (I saw it while buying a 40 lb work vise!) and needs a clean and maybe some parts. I have the motor, machine, treadle and thread holder thing but will need to make a table for it. Thanks for the info!
It has it's limts but also is a very enjoyable machine to use. It is my daily worker. Fast and reliable. Not fussy about thread type and will work on a wide range of fabrics. Enjoy your new project! There is a Facebook page for vintage industrial sewing machines and they may have help if you need it in the future.
DeleteManual: http://www.sil.si.edu/DigitalCollections/Trade-Literature/Sewing-Machines/pdf/sil10-227.pdf
ReplyDeleteI picked up a W&G machine about a month ago at an auction. It says a Type 10-A with a serial no: L171319 . Can any one give me an idea how old it might be. It is on a more or less modern industrial table with a good electric motor. Im in the process of doing a through clean up on it. It appears to be jammed at this time as I am unable to turn the wheel by hand. I will need to get a belt for it and some needles. It looks to be in good shape. I wish I could find more operation and mechanical information on it.
ReplyDeleteI have been unable to get a date for mine, but was told that becasue of the set up and light, it was before 1940. I have asked in a Facebook Willcox Gibbs forum and a vintage industrial sewing machine forum and got no answers, sorry. Check the bobbin area for thread near the case. Make sure it is well oiled, hard to test for a problem until that is done. Why I mention the bobbin area is that this machine handwheel turns away from the operator, and all it takes is one person doing it one time wrong to mess it up. That may have occurred before you got it. it did to mine....by me testing it.:) The belt is indutrial width, and needles I added to the blog post. My manual is a copy I got off eBay, but had to have mailed from England. If you can't locate one message me.
DeleteI have one with a serial number L173378. If you find any information about dating, please send an email.
DeleteHi the belt inside my machine has snapped I need to no how to get to the spoil so I can change it
ReplyDeleteI have not done this repair so can't help you. Try here for the part: https://www.tolindsewmach.com/about.html
DeleteAlso if you send pictures or let me know where they are posted (such as Flickr) maybe I can help figure this out with my own as a guide.
DeleteDid you make the belt?
ReplyDeleteThe belts are leather industrial belts. Similar to home sewing machine be,ts but thicker. Cut to size and attached with metal clip. Hassle to do but long lasting. Is that what you mean?
DeleteThat is not the timing belt. The timing belt has teeth and is inside the machine.
DeleteOK. I would not generally assume anyone would make a timing belt, it is a manufactured part. Mine came with it intact.
DeleteI just found my newest obsession yesterday! I've been restoring vintage Singers for over 10yrs and have completed a couple of small W&G's but this model 10 is my first industrial W &G...it's cleaned up great and the only thing that really needs replacement is the motor - any suggestions where I can find a decent replacement?
ReplyDeleteGlad to meet another person who has this sewing machine. I have not replaced the motor on mine yet so am not sure of the particulars on how to fit a new motor under the table. That said, I see no reason why you can't do this and have often thought of it myself. I use industrial sewing machines for work, many outfitted with servo motors. Love them. Quiet, smooth and easy to learn to use. That would be my recommendation and most shops who cater to industrial sewing would be able to help. For a start there is Toledo Industrial Sewing if you are not located near one such shop. Expert advice from Mr Kovar.
ReplyDeleteJust bought my SECOND W&G Highspeed Lockstitch Type A sewing machine! Still have the first but bought a second one because it came with all the feet, a few extra bobbins, the wrench, thread holder, bobbin winder, table, etc etc...and it cost me $50. I replaced the motor on the first one with a servo as the original motor had been sitting for about 70 years and it sparked and scared the dickens out of me. It was a challenge to install the servo as the table had a lower extension in the bag for factory work that couldn't be removed and the motor mount for the original motor was designed to accommodate that fact. Had to buy a servo that allowed me to adjust its position and it just barely fit. Just like the first, the second started right up after decades of non-use and sewed perfectly. I can't thank you enough for your invaluable information - I never would have been able to figure it out myself!
ReplyDeleteI am considering a servo motor as I like them on the machines I used in a shop. I am a bit apprehensive about any adjustments. Glad to know you have your machines working now. Thanks for stopping by.
DeleteDoes your timing belt have a part number or did you get any extras?
ReplyDeleteThere is no part called Timing Belt in my book. There is a Hook Shaft Belt, with eyelet holes, listed as Part 106F.
ReplyDeleteNo extras, this is not meant to be changed out like a home machine. Mine is an original part.
DeleteThe belt on my mom machine goes in the inside gears. I had to take the wheel (do not know correct name) off and it was inside. It is like a fiber tooth belt. Do you have a parts diagram you can share?
DeleteThanks
Just to make sure you see this: the part is number 106F. it is called HOOK SHAFT BELT with eyelets. I do have a page in my manual about how to change it out. If you send me your email address I can give you a photo of it. Presently I am not sure how to post the entire manual online. I bought this reprint manual on eBay if you want to try and get yourself one, it is handy to have anyways. my email: yarndiva@aol.com
Delete100fires@gmail.com. Thank you for sending me the page. Do you know if any place to get the belt?
DeleteWere you able to send the pic?
DeleteI have the exact same model as shown in your example. This machine has lasted for 2 generations and still works! The oil "window" has degraded so the well hold little oil. Can you recommend a brand of oil for this machine. The oil I had no longer is useable per my engineer husband. Also, how does one manually lubricate the machine. Thanks.
ReplyDeleteI manually lubricate this too by putting a drop of oil in the holes near the front, at the back and near the hook. your husband is correct. Old oil is not good so give this old timer a good clean. I over oil it fors time then lighlty oil from then on. Clean up any spills by tilting it back and using a clean cloth.
DeleteMine leaks oil hrough the window on the front so I add only enough to pump through, maybe 2 oz at a time.
I use regular sewing machine oil. WAWAK is a great supplier for mail order if you can't find it locally. You will be using a fair amount so the tiny bottles from fabric stores will go fast, get a larger one. Mine takes about 4 oz each fill. I do that about once a month as I am no longer using it for many hours daily.
ReplyDeletePotential tip on how to tell the difference between a Model 10-A from an 11-A -- if there is no such stamping on the maker's circular plate on the pillar bellow the hand wheel. As per the illustrated literature from W&G found on the Smithsonian site; The decal "Automatic Lubrication" appears Above "Willcox & Gibbs S.M. Co." on 10-A machines; and Below the same text on 11-A machines. The their standard high-speed lockstitch machine and 10-A literature is foundational, so you should really download it before you look at the 11-A flyer. W&G states that the difference between the two is, in essence, that 10-A is for light to medium weight fabrics, and 11-A is for medium to heavier weight fabrics. As of this posting, all of the W&G info is on the Smithsonian website: type in your search engine "Willcox Gibbs lockstitch 11-a" and that should bring up their historical trade literature site in the first 10 citations.
ReplyDeleteYarndiva - thanks so much for this blog post. I came to a slight bump in the road when you mentioned bobbin winding. Unless I'm not seeing it, I didn't think there was a bobbin winder on this machine head. Did you use a W&G table mounted bobbin winder? Or would a standard table mounted industrial bobbin winder work just fine? Thanks
ReplyDeleteSo sorry for the late reply. Yes I do use the one that came with my set up, made for the WG Lockstitch. I am not near another industrial at the moment to try out the theory. The bobbin hole circumference on the WG is smaller than most industrials, like the Juki.
DeleteVery helpful.
ReplyDeleteJacket Back Digitizing Thank you.
Industrial sewing machine stand - Discover high-quality industrial sewing machine stands designed for durability and stability. Enhance your workspace with our reliable and efficient solutions.
ReplyDeleteHello
ReplyDeleteI have just been given a Type 10, and now trying to find needles.
I keep getting told W&G64 or WG502, but now i find your blog and 75W type needles. Help please ! I am so confused ! ☹️