 |
| Singer 66 Handcrank | | | | | | | | | | | | | | | | | | | | | | | | | | | | | | | | | | | | | | | | | | | | | | | | | | | | | | | | | | | | | | | | | | | | | | | | | | | | | | | | | | | | | | | | | | | | | | | | | | | | | | | | | | | | | | | | | | | | | | | | | | | | | | | | | | | |
|
|
|
|
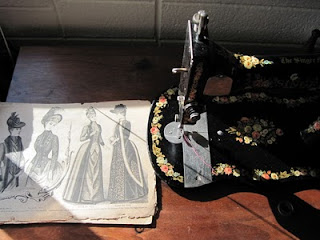
One of my favorite sewing machines is also an unusual one. It is operated by turning a handle. They were many made by manufacturers in many countries with a lot of variety. The hand crank sewing machine was more popular in Europe but there were many in North America and the world as well. Many can still be found today. My particular model is a Singer 66 from 1909 and decorated with a lotus floral pattern, part of a very popular Egyptian art style of that time. I take this one out from time to time to use and to demonstrate how sewing machines work in slow motion. It is not just show, however, and I'd like to point out that this type of machine can do more.
I feel that hand crank sewing machines do two things exceptionally well: Purse making and doll clothes making. It's all about control. The handcrank sewing machine is best when you need close control of stitching for best results. This is handy when closing the edges of purses around handles. The large harp area of the Singer 66 also helps. The photo above shows rick rack that was inserted quite easily.
Projects that require precision, such as doll clothes shown here, are perfect for the handcrank sewing machine. The small size of doll clothes make them a bit finicky but a great way to learn to sew. This is especially true when combined with the slow speed of this machine. So many great seamstresses started this way, as the clothes are made much like the real thing. You can see that here, with the bodice of a Barbie dress.
 |
| Barbie dress bodice with turn under facings and darts. |
 |
| Beginning a seam |
What's Different?
There are some things about using a hancrank that take some getting used to. One of those things is that the beginning a seam, for me, is handled differently. Because you have one hand to control fabric and there is no reverse motion your normal routine will change slightly with a handcrank. Keeping the thread from tangling at the beginning is one problem. I prevent this by holding the thread with my index finger, I also pin up close at first then remove it after a few stitches. To keep the first stitches from unraveling, lock the stitch it is done by re-stitching the first two stitches This is just what is done with treadle machines or those with no reverse. To re-stitch, I simply give the fabric a slight tug while beginning the seam so the first stitches get stitched over.
As an aside, I use this little tool a lot: the Clover Mini iron. It can be used right next to the machine.
 |
| Connecting the bodice to skirt. Just like a real dress. | | | | | | | | | | | | | | | | | | |
|
|
|
 |
| All done! |
How does it work?
One question I hear often is how can I turn the handle and sew at the same time? It does take some practice but can be done with great success. Turn the handle but don't look at it. Keep your eye on the presser foot. Keep your other hand on the fabric. An advantage to this process is you can really look at what you are doing and slow or pick up speed accordingly automatically. That is not as easy with electrics or treadles.
Feeding fabric through strait is the goal. The machine should pull it fairly evenly. If does not, the main issue is usually the tension with mine. If your machine thread tension too tight, it will want to distort and pull the fabric off center. With correct tension, proper needle, and slow speed you can lightly guide fabric right on through. Presser foot pressure is also sometimes a problem. Check to make sure you do not have it too tight. This is adjusted by a top screw above the faceplate. If you are not sure about this subject, check your manual. It's good to know how it all works.
If you have not seen a handcrank sewing machine in action, here's a quick view.
Can I Make My Own Handcrank?
Sometimes older machines are converted to hand crank. There are inexpensive modern kits to do this. The machine needs to have a place to mount the handle. Good candidates are the Singer 27, 28, 127, 128, 66, 99 and the Singer Spartan. I have heard good things about the Necchi BU machines as well. There are many reasons for wanting to convert. I have done it for a Singer 128 that was in a broken treadle cabinet. Finding another 3/4 sized cabinet for that model would have been tough due to rarity. Not all machines can be changed but some can.
All in all, these are a great addition to anyone's home. They are portable, beautiful, can be used by children and most important...they take up little space!


