Anne Makes Soap...and you can too.

This is a very old time proceedure that has great every day benefit to nearly every one. Making soap is another of those housewifely things people did in our recent past that have a place in our homes today, if we want to take the time. Easier than sewing, in case you are wondering. ;) I have been making my own soap for over 25 years and have been asked many times how to do this and so will do that here. There are many sources for supplies and many tutorials surely. Seek them all out for more insight. My own favorite is Mountain Sage Soap Makers Supply for start.
Assemble Your Supplies
I have gathered a nice set of supplies over the years and so what you see me using you may not have, or have yet. When I started no supplies such as mould boxes were around, so mine were made for me. I bet you can now find everything. Because of this I will include basics and you can search for extras yourself as needed.
The soap, water and lye bring about a very caustic mixture. All utensils and pans need to be able to tolerate this as well as the heat generated. Leave your favorite kitchen utensils out of this project. No aluminum.
Tools:
Kitchen Scale
Kitchen gloves
Glass measuring cup Large 8 cup or equivalent.
Small glass measuring cup
4 Plastic tupperware style containers
Large stainless steel wisk
Large stainless steel or plastic spoon
Large stainless or Glass Pyrex stock pot
2 Shoe Box sized moulds.
Fleece Blanket
Bath Towel
Nice to have if possible:
Pastry cutter
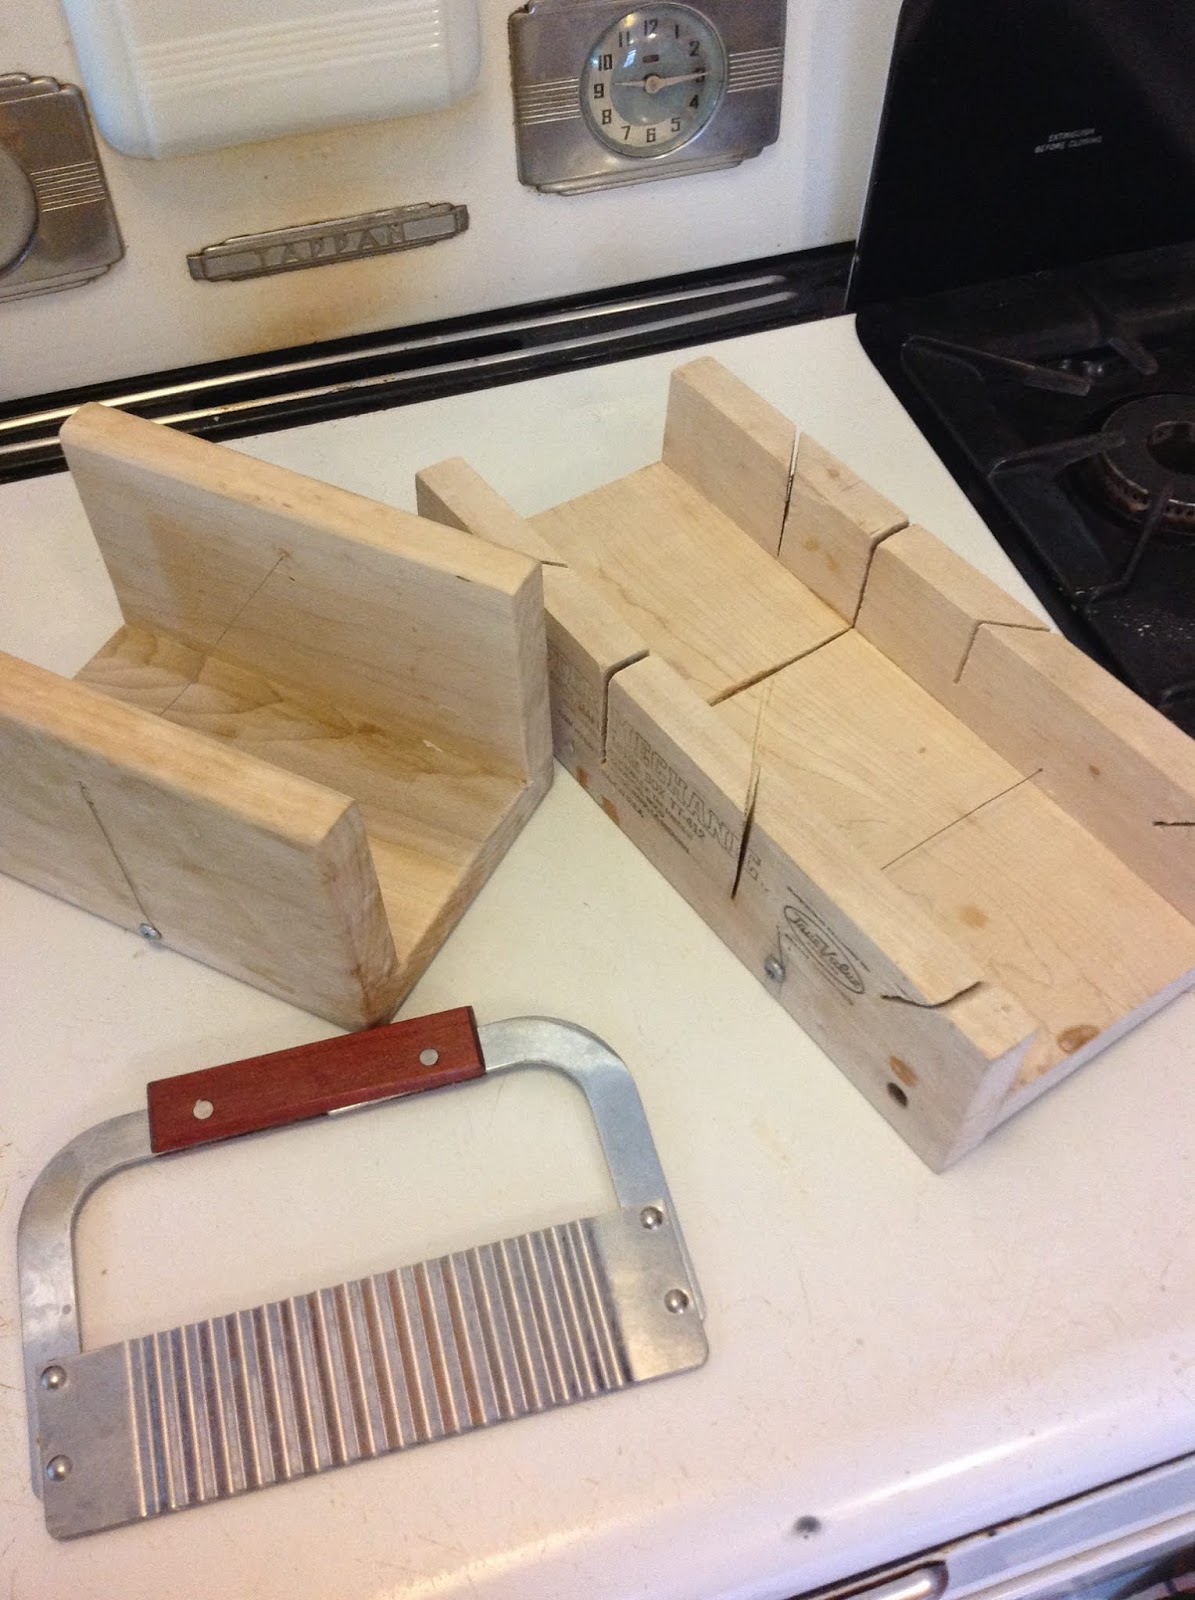
Mitre Box
Wire bakery racks
Long thin fillet knife
 |
| My Best Pot for Soap - Visionsware. |
The Recipe
This is my tried and true recipe. I have changed it up many times to make special soaps such as shampoo, creamy oatmeal and antiseptic soaps. You can too but this is the base. The quality is great and is the most economical. It works. I leave out expensive oils but if you feel creative than go ahead. Many recipes are out there. I mainly like clean clean clean.
12 Oz Lye
32 Oz Cold Water
24 oz Cocount Oil
24 oz Olive
38 oz Crisco
4 oz essential oil
Notes: The olive oil used can be Pomace oil. No need for the best food quality here, and in fact Pomace olive oil is great. Go off brand for the Crisco too. Hydrogenated cottonseed or soybean oil is fine. I don't use perfume oils for soaps. Lye (sodium hydroxide) is found at hardware stores.
Get Started
Prepare the mould. I use a home made box that comes apart, so htat is what is shown but you do not need that right now. When I started I used two Rubbermaid shoe boxes and so you can start there. Grease the sides with shortening so he soap will come out easier. They will be filled about half way with your soap recipe. I have found that two smaller ones seemed to cure better than one big one for me but be aware you can use one larger one. Just my preference.
Create a curing location that is draft free for the boxes to sit for 24 hours. I have used different spots for this, being mindful that they ned to be safe from cold and not be knocked over. Place a towel under and blankets with go on top later.
Get all supplies together and pre-measure the oils. Set aside.
THIS PART IS IMPORTANT. Soap is caustic and dangerous when being made.
Make sure all distractions are gone. Do this only when no children or pets are nearby. Clear the area of clutter.
Mix the Lye and Water
 |
| Lye station is ready to be taken outside. |
DO THIS OUTSIDE. There are fumes when water and lye are mixed together. Turn away and do not breathe. I take a breath and hold it for this!
Slowly pour the lye granules into the water. Mix with metal wise. It will get very hot. Set aside in a safe place. Bring inside after a minimum of 15 minutes.
Mix the Oils
Add all the oils to the pot and melt, using the lowest heat. When melted, turn off heat and remove pot from burner. This helps to cool faster.
Combine the Lye Mixture and Oil Mixture
This part is done when both the lye and oil have cooled down a bit.
The tempertature should be about 90 degrees, way down from the melting point. How long it takes varies with air temperature and how hot the stove burner was. Usually about 30 minutes or so. I test by touch in the oil, if it feels hot but not burning hot then it is time. Also the oild gets lightly cloudy when cooling. Not too scientific, I know. The lye container should be warm but not burning hot.
Add the lye mixture to the oil pot slowly. Mix with wire risk carefully. DO NOT SPLASH this mixture. When mixed switch to the hand blender. This device is not essential but sure does a nice job of completely mixing. After a few minutes the soap will thicken. This is the chemical reaction beginning and soap being created. It will leave marks on the top as when making gravy or pudding. This is called the trace. When you can drip onto the top of the mixure and it stays on top you are done.
Add in Color if Desired
I rarely do, but many people love this. I will leave that to your own research as to what and how. Lots out there on the topic.
Mix in Essential Oil
Add in your scent in desired. Mix completely.
Pouring Time!
Now pour into your prepared moulds. I usually fill two shoebox ones half way. When both are evenly poured I take a spoon and mix one last time to make sure it all is evenly mixed. Cover both and place safely away on top of the towel and place the blanket on top. This is to insulate as the continuing chemical reaction takes place. It will get warm again and then cool when ready.
 |
| Warm and Cozy for one day. |
Opening the Mould.
After 24 hours, or the next day, it should be cool and ready to open. Open the lid but don't remove the soap. It need to dry another day or two. When the time has come and it can come out, have your towel out. Turn over the mould and it should come out. If not, let it dry more.
 |
| Opening the mould. This is a box with door hngles. I remove the pin and it comes apart. |
Cutting and Drying
I use an old mitre box to do this and have the bars come out even. You may not need this and can cut soap any way you like. The pastry cutter gives some texture to the cut as well as being easy to handle. A thin paring knife is another good choice. The soap should be soft but not sticky. If it is too soft, wait. Now that I have been at it a while, have found an old guitar string is best for cutting but it had to go into a wood frame to handle well. I bet there are soap cutters now. Place each bar onto the bakery rack.
 |
| Ready to cut! |


Now the Wait....
The soap needs a bit more time to dry further and become more mild. Usually two weeks at minimum. Enjoy!
Now, all kinds of things can go wrong. I have had every disaster happen, and yet I also have had it go right too. There is help out there for a better next time. Generally this works and you get about 40 bars of soap. Good, high quality soap. Great gifts too for both men and women and all kinds of people. I use nothing else now, with the exception of other people's home made soap! You'll be the same I bet. Clean it up people!
No comments:
Post a Comment